Change your Focus

“I have this ability to find this hidden talent in people that sometimes even they didn’t know they had.” – Berry Gordy

Routines are important.  They create structure to manage stress, get stuff done and even unleash creative potential.  In our current pandemic remote working world, routines can be a big help in creating some stability out of chaos.  At the same time, they can also drive a level of monotony that can wear on your soul. 

Last week I was on a call with a group of people who mentioned that it feels like we are living the movie, Groundhog Day.  Each day, each meeting, each event starts to feel the same.  We talked about working from different rooms or even working from outside to help mix it up.  Sadly, this monotony can extend to our relationships.  Most of our interactions are now digital (video conferencing, Slack and email).  There is a danger that we start treating only the presentation layer.  We give shallow consideration of each other to get on to the next meeting.  We may do that just to survive our meeting loads.  But that definitely doesn’t build depth in our relationships or bring the level of significance to our work that we want to enjoy.  What can we do?

I have a radical idea. I suggest we focus some of our own energy in each meeting seeking to better understand each other.  Watch, observe and take note of the unique skills you see in others.  But don’t stop there, recognize them for it.  Send them a note, speak up or appreciate them for what you see.  Learn from them.  Acknowledge them.   Our hard-wired tendency is to focus on ourselves.  Survival naturally depends on that, but it is singularly minded and will limit our experience, growth and impact.  Instead of focusing on the video conferencing camera, turn your focus to the other people on the call.  What can you do to encourage them?  What do you see in others?  Do you see some unique talent or skill that they may not even know?  If so, tell them.  We can all use encouragement.  

It may be Groundhog Day again, but I suspect if we change a little of our focus, we will see the world in a whole new light.  See what you can do this week to discover something new about your team members and others.  For those of you with partners or kids, I suggest you try the same thing at home and see what happens.  You might even spot something brilliant that even they didn’t know they had.  Imagine if the whole world did that.  Wouldn’t that be wonderful?
Digital Scale for 3D Printer Filament

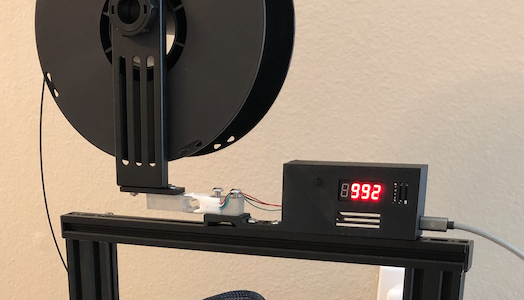
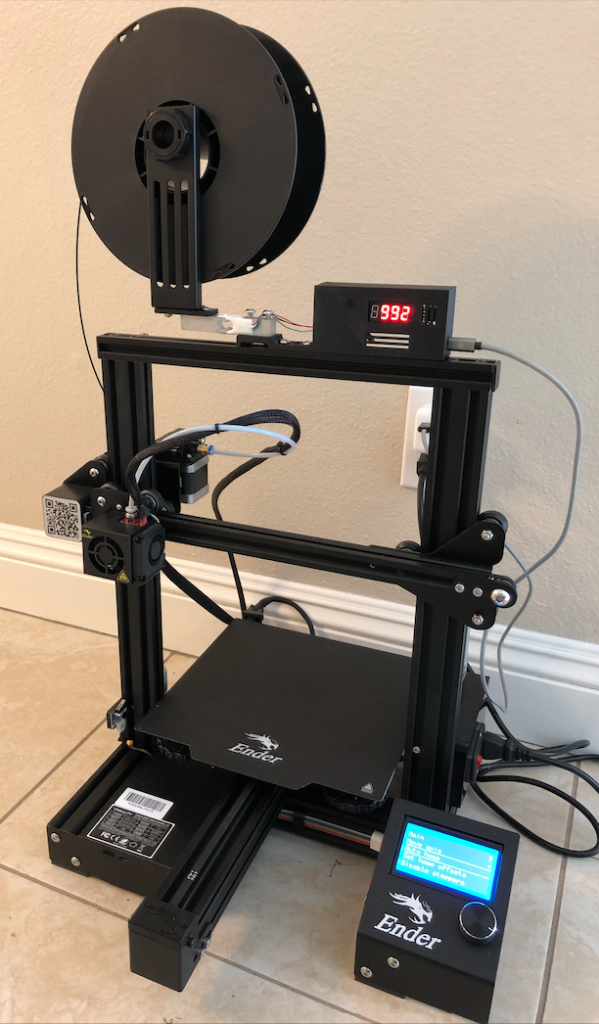
This project is to add a load cell to the filament spool holder of a Creality Ender 3 Pro 3D-printer to measure and display weight of spool. Using the tare function of the scale on an empty spool, the user can determine the amount of filament (in grams) remaining on a spool.

This project uses an Arduino or ATtiny85 microcontroller with the HX711 load cell module for weight measurement and a TM1637 4-digit LED display. Project GitHub Link

Components

  • ATiny85 Microcontroller (DigiKey)
  • TM1637 4 Digit Segment LED Display (Amazon)
  • Load Cell with HX711 Load Cell Amplifier (Amazon)
  • 100uF Electrolytic Capacitor
  • 5V Power Supply – Micro USB to DIP 5-Pin Pinboard (Amazon)

Schematic

Schematic

How to Build

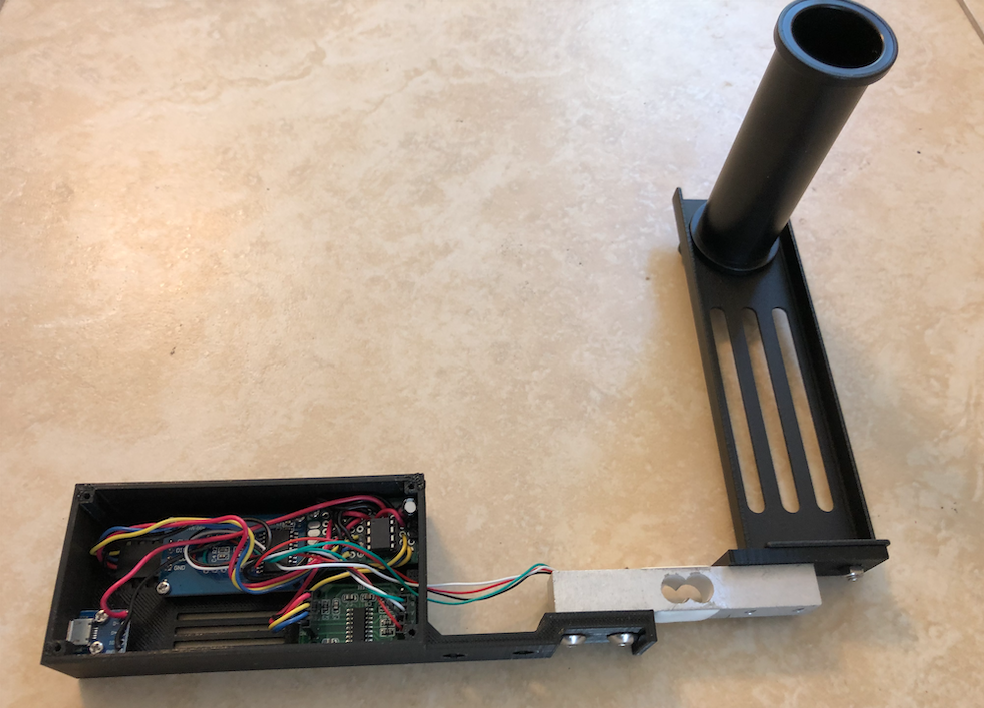
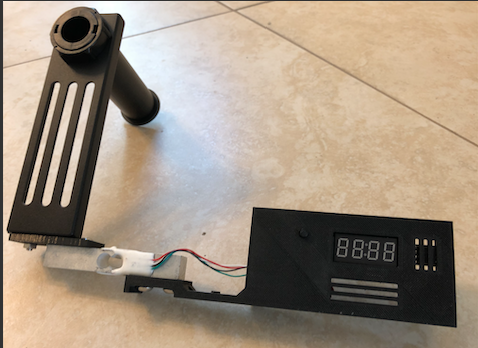
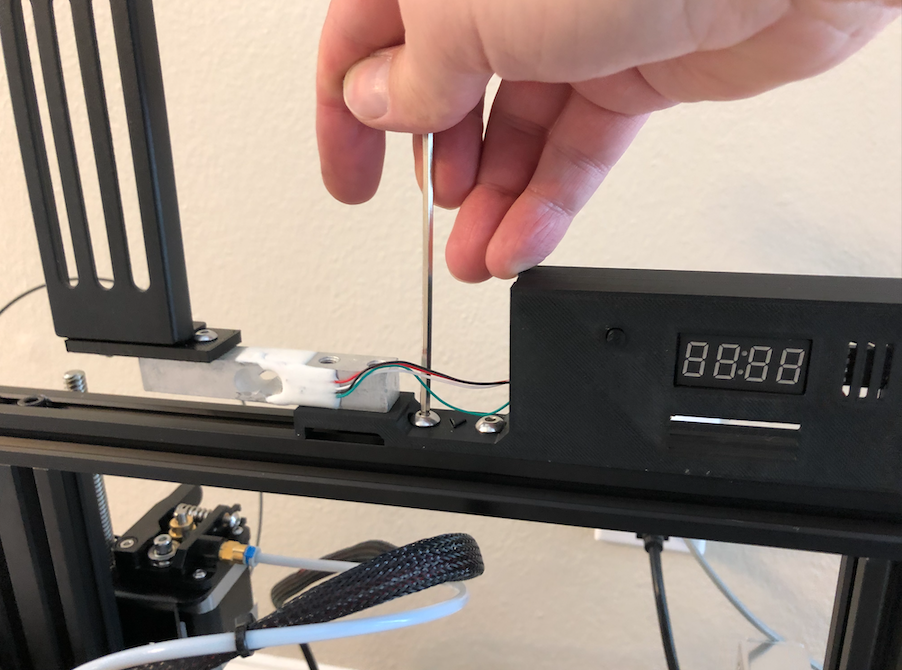
The filament scale mounts on top of the Ender 3 top rail where the filament spool is located. You will need to print the load cell mount and the LED display box. This is available on Thingiverse or Tinkercad. See example build pictures below.

Setup & Calibration

Download the Arduino code here: https://github.com/jasonacox/Ender3-Filament-Digital-Scale

This sketch requires that you calibrate the load cell. This involves the following steps:

  1. Run the sketch with DEBUG true (using a Arduino Uno or other microcontroller with serial)
  2. Record the “HX711 reading” values with NO load on the scale – this is your “CAL_OFFSET
  3. Use an trusted scale and weigh an object (grams or kg) – record this value as your “KNOWN-VALUE
  4. Place the object on the load cell and record the “HX711 reading” – this is “CAL_VALUE
  5. Compute the CAL_RATIO = (CAL_VALUECAL_OFFSET) / KNOWN-VALUE
  6. Edit the #defines in the code
    CAL_OFFSET  = -148550
    KNOWN_VALUE =  382.7186 g
    CAL_VALUE   = -107150
    CAL_RATIO   = (CAL_VALUE - CAL_OFFSET) / KNOWN_VALUE
    CAL_RATIO   = ((-107150) - (-148550 )) / (382.7186)
    CAL_RATIO   = 108.17

Programming Notes

The TARE button uses PB0. If you use the Tiny AVR Programmer from Sparkfun it drives an LED on PB0 and once the sketch is uploaded, the ATTiny will read PB0 as LOW and assume you wish to TARE the scale. You will need to remove the the chip from the programmer after uploading to get it to work correctly in the circuit.

Tare Function

On start the circuit will read the last TARE value from EEPROM and display the the current weight. Press and hold the TARE button and the current weight value will be recorded in EEPROM and subtracted from the current reading to “Zero” out the scale.

Assembly

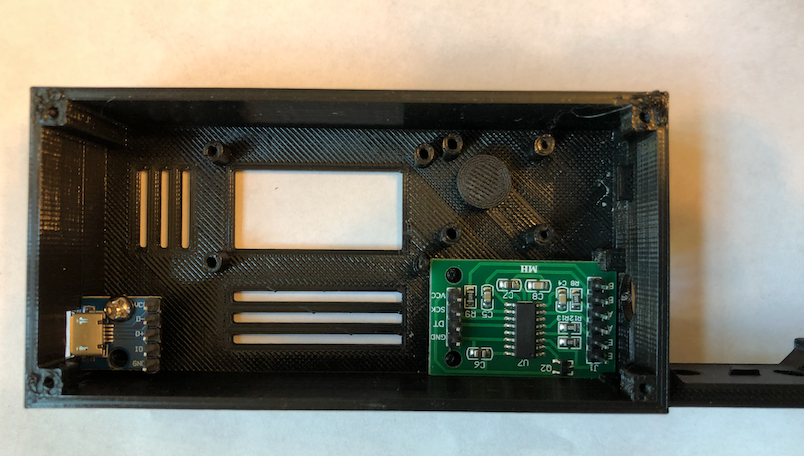
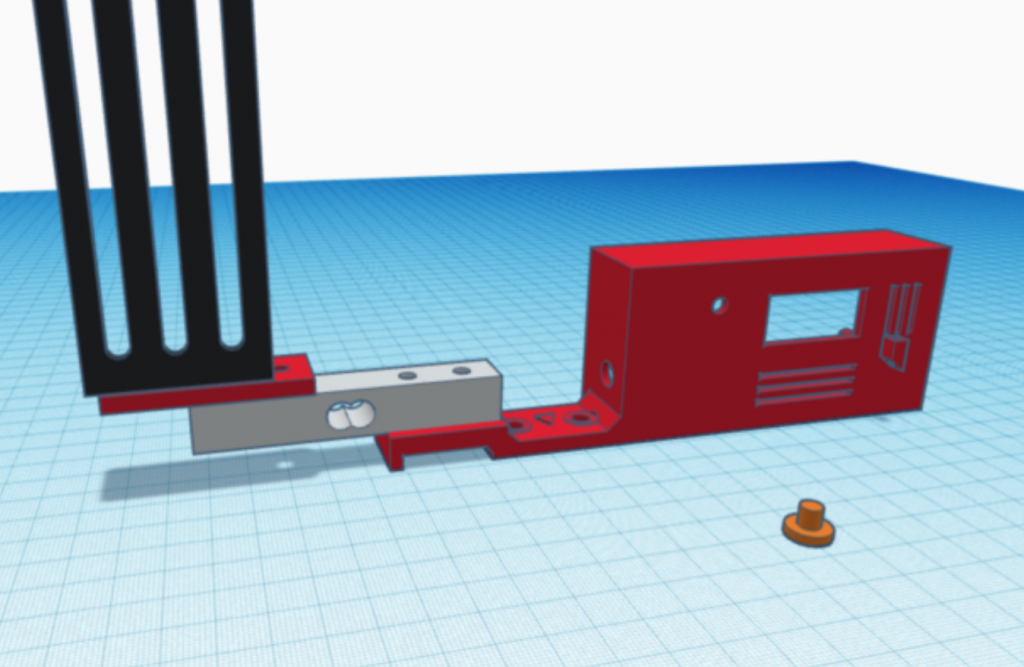
The 3D model for the case and load cell mount is on Tinkercad and available for download on Thingiverse. The case is open-back for simplicity and it has mounting holes that use the existing spool bolts and fasteners.

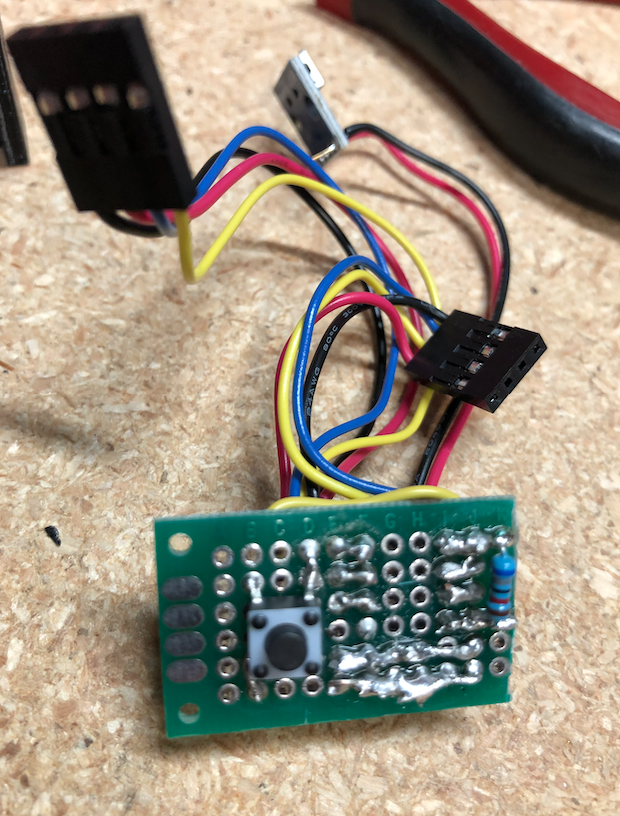
I used a small 20mm wide project circuit board to mount the ATtiny85 socket, resistor, electrolytic capacitor and microswitch. The microswitch is located on the bottom and will face the hole on the front of case. A circular 3D printed button will fit in the hole and press against the microswitch to activate the TARE function.

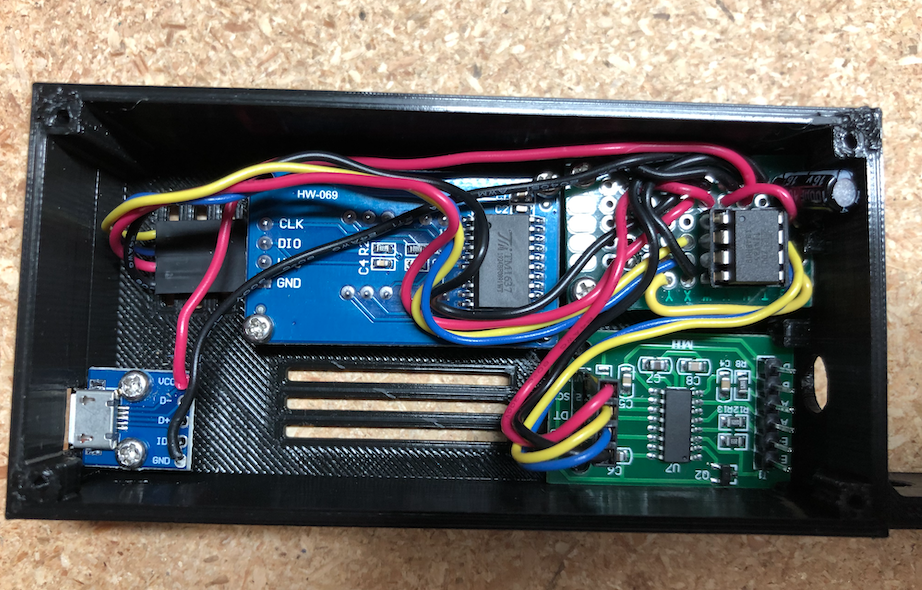
The case is designed to hold a USB plugin board, the TM1637 display, the controller board and the HX711 load cell module. The HX711 slides in with a hole on the side to feed the load cell wires.

You will need M5 bolts to mount the load cell onto the 3D printed case bracket (see pictures below) with bolts going up into the threaded load cell holes. The filament spool holder that came with the Ender 3 Pro will attach to the “load” end of the load cell (the end marked with the down arrow and max weight). A 3D printed shim adapter will go between the filament holder and the load cell. An M4 bolt will go down and tighten into the load cell. The other M4 bolt will need a M4 nut under the shim.

Attach the scale and filament holder back on to the top of the Ender 3 Pro using the two M5 bolts and M5 T-nuts that came with the printer.

Plug in the scale and put an empty filament spool on the holder. Press the TARE button to zero out the weight (it records this TARE value in EEPROM memory so it remembers it on power cycle – you shouldn’t have to use TARE again). Now replace the empty spool with one with filament. It will now show you the estimated amount of filament remaining. it has been surprising accurate for my project. Notice the example below shows a slightly used 1kg spool is reading 992 grams.

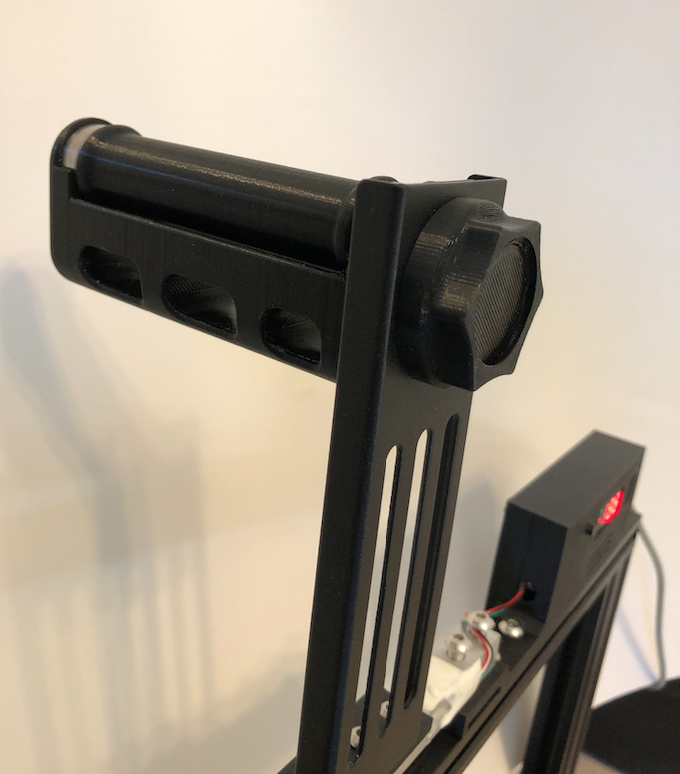
Optional Roller Addition

I immediately noticed that when printing, as the extruder stepper pulls the filament, the weight will change, reflecting the dynamic force of the pull and the sliding friction resistance of the static spool holder rod.

I decided to addd a real roller to the spool holder so I printed this model that uses two bearings to remove friction: https://www.thingiverse.com/thing:3209211

References

Father’s Day Thoughts – Standing on the Shoulders of Others

“You are where you are today because you stand on somebody’s shoulders. And wherever you are heading, you cannot get there by yourself. If you stand on the shoulders of others, you have a reciprocal responsibility to live your life so that others may stand on your shoulders. It’s the quid pro quo of life. We exist temporarily through what we take, but we live forever through what we give.” —Vernon Jordan

I thought a lot about my dad this Father’s Day weekend.  He passed away five years ago in June and I still miss him.  Like all fathers, he wasn’t perfect, but the lessons he taught me have had a profound impact on my life.  I wanted to share some of those lessons with you today.

Be an engineer – Plan ahead.  I can’t remember a single project that my dad took on that didn’t have a plan fully developed before he started.  Many times, he even had written diagrams and details.  He would be frustrated when we (especially my sister and I) would act without thinking ahead. It was his fundamental philosophy. He loved seeing how efficiently he could get something done.  Apply engineering discipline to problems, projects and even PLAY.  That’s right, he would have blueprints drawn up for our vacations (ok not exactly but they were fully planned).  But it all taught me the value of engineering, being thoughtful, solving problems with design, science and planning.

Work hard – My dad was never afraid to do the hard-manual work himself, mowing lawns, repairing his car, fixing something at home or working long hours to get a job out at the office.  While not unkind he had little patience for lazy people (or his own kids). He set the example with hands-on effort, blood, sweat and tears. 

Be considerate – My dad would say “leave things better than you found them”. When you can, go above and beyond when dealing with others.  If he borrowed something he expected to return it in better shape.  Being considerate was really about the golden rule. Treat others as you would want to be treated. Don’t make others have to wait on you or clean up after you.  

Details matter – Craftsmanship and precision artistry should be in all things.  My dad would say, looking at a car, a tool, or anything else, “See how the seams line up?  Notice the precision of the gap.”  You can see and feel the quality.  If you were cleaning he would help you see if you missed a spot. Underneath?  Did you get the crevices?  Check the edges.  It taught me to have an eye for detail.

Enjoy each moment – You should savor and soak in life.  Laugh and smile.  Anytime we tried something new, my dad would provide instructions: slow down, observe, enjoy and taste all the flavor. That mindfulness approach to living life transcends all the chaos, turmoil and Coronavirus pandemic world we live in.  It reminds me to look for the good and breathe it in.  Appreciate each moment and celebrate life together.

Many of us can look back to others, our parents, grandparents, friends or mentors and think how their lessons and investments in us have made profound differences in our lives.  The foundational opportunities we were given are gifts, unmerited and incredibly powerful.  Not everyone receives the same investment or shoulders to stand on.   As Vernon Jordan eloquently put it, if we stand on the shoulders of others, we have a reciprocal responsibility to live our life so that others may stand on our shoulders.  It would be unjust for me to take what I have been given and not share it with others. 

What are you doing to help others in your family, on your team or in the world?  Don’t miss the great opportunity to pay it forward, encourage others, invest your talents, time, energy and resources in helping each other.  Plan to make a difference in someone else.   “We exist temporarily through what we take, but we live forever through what we give.” 

What’s in your tea cup?

“Character is power. If you want to be powerful in the world, if you want to be strong, influential and useful, you can be so in no better way than by having a strong character.” —Booker T. Washington

I love tea.  Many of you know how much I like coffee, but you may not know how much I also enjoy tea.  I have tried many teas over the years but my current favorite is PG Tips, a popular British blend of Assam, Ceylon and Kenyan teas.  It’s interesting to me how they can all look and smell the same in the tea bag but can be so dramatically different after steeped.  You can’t know the flavor until the hot water pulls it out from the leaves.  So often in life we think we know our own character and what is core to our being, but it isn’t until the trials of life that we truly discover what is on the inside.  Like tea, our true character is revealed in the hot waters of difficulty, stress, pressure and challenges.  What we really are, what we have cultivated and nurtured on the inside spills out.  Difficulties don’t define us, but reveal the true us.   

We just crossed over the 3rd month since the start of COVID, social distancing, face masks, safer at home remote work and now economic and social justice issues. How are you doing during these difficult times?  What is spilling out of you?  What have you learned about yourself and others?  Does it make you happy or make you want to change?  These are questions I’ve been asking myself.   I must confess, I feel like I’m a bit more like Decaffeinated Lipton than PG Tips.  I am too easily frustrated and irritated at things that don’t go my way.  I don’t always listen well (my family helped me discover this).  I should be more vocal and active in supporting my fellow human brothers and sisters.  I have work to do.

As the hot waters of difficulty and change washed over my family and team, I must say, I am incredibly proud. I have seen heroic characters surface in areas I didn’t expect, compassion, generosity, optimism and leadership spill out from all areas.  I have also seen a river of creative problem-solving.

Sure, there have been moments when tempers flare and struggles with despair set in, but even in those moments we have had good conversations.  I know that we all have a list of things we have discovered about ourselves and each other.  My challenge to you today is to not let this great opportunity go to waste.  As we do with all incidents, this is a great moment to study, learn and change.  Be understanding.  Be kind but also be brave. 

What’s in your tea cup?  What would you change about yourself?  Your character spills out and becomes a powerful agent to influence the world around you. You matter.  Your character matters.  What you are inside will be revealed during difficulties.  Take this opportunity to learn about yourself and cultivate a strong character so that when it spills out it becomes a powerful and useful influence on the world. 

ATtiny85 Weather Station

Weather Station

This project will show you how to build an ATtiny85 based mini Weather Station that displays temperature, humidity and pressure using four easy to read 7-segment LEDs.

Requirements

This sketch requires a version of the Wire library that is compatible with the ATtiny85 for the I2C communication to work with the BME-280 sensor. I used the ATTinyCore arduino core by Spence Konde which has a version of the Wire library that works with the ATtiny85. I was able to use the standard Adafruit_BME280 library to pull data from the BME-280. You can install ATTinyCore by putting the board manager URL in the Arduino IDE preferences:

http://drazzy.com/package_drazzy.com_index.json

Set the board to the ATtiny85 chip at 1Mhz (internal).

Circuit

Components:

  • ATiny85 Microcontroller (DigiKey)
  • BME-280 Sensor (Temperature, Pressure, Humidity) (Amazon)
  • 74HC595 8-bit Shift Register (Qty 4) (DigiKey)

Sensors

  • 7-Segment LED Display (Qty 4) (DigiKey)
  • 0.1uF Ceramic Capacitor (Qty 2)
  • 100uF Electrolytic Capacitor
  • 5V Power Supply (Alternatively you can use a 5V Solar cell, 3.7V lithium ion battery and a TP4056 constant-current/constant-voltage linear charger to charge the battery during the day).

Schematic

Circuit Board

ATtiny85 Microcontroller

Circuit Board

Programming Notes:

Code for this project is located on Github: https://github.com/jasonacox/ATtiny85-Weather-Station

I2C communication with BME-280 uses pins PB0/SDA and PB2/SCL. If you use the Tiny AVR Programmer from Sparkfun or something similar, keep in mind that it drives an LED on PB0 which will interfere with I2C communication. You will need to remove the chip from the programmer after uploading to get it to work in the circuit.

Memory Warning

This sketch uses nearly all of the ATtiny85 program storage space (8K) so you may get an overflow error if the libraries change or you add any code. To address this, I created a minimized BME280 library to reduce the PROGMEM space required. You will need to download and install the Tiny_BME280_Library library in:

~/Documents/Arduino/libraries/ directory and restart the Arduino IDE.

Display

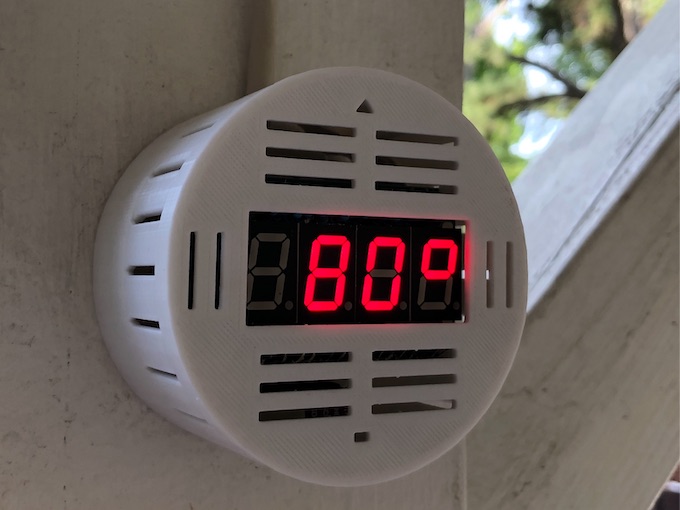
  [ 70'] - Temperature in degree F 
  [ 24r] - Relative Humidity %
  [_970] - Pressure in hPa with rising/falling animation
  [ 21c] - Temperature in degree C 

Construction

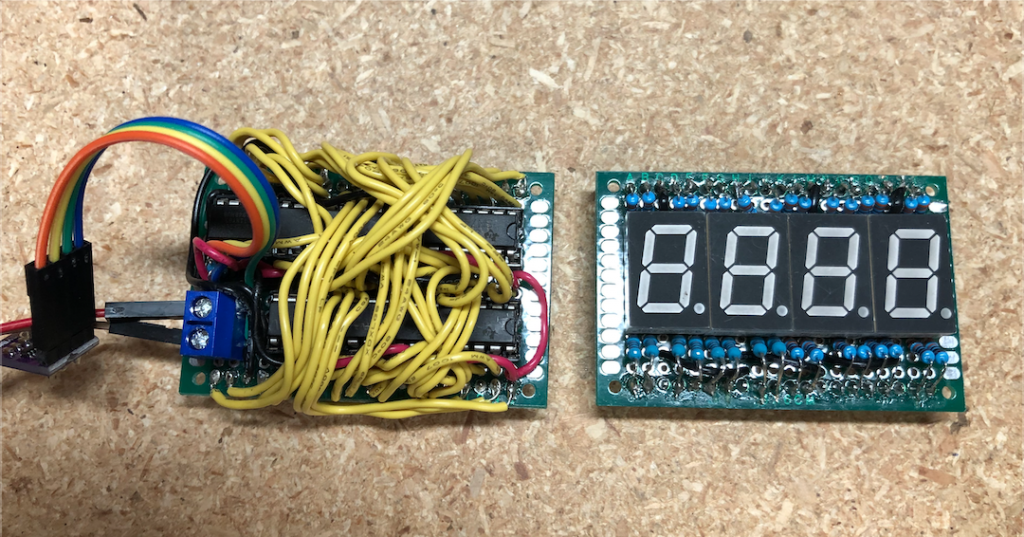
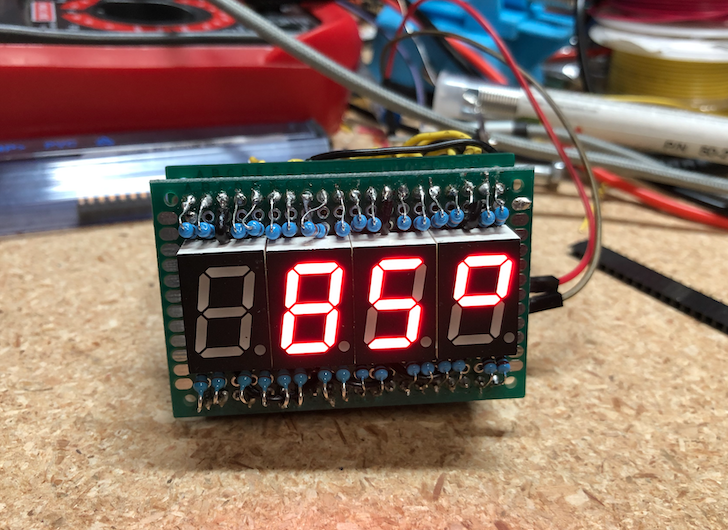
I used two circuit boards: Display and Logic board. The Display board holds the four 7-segment LEDs with the array of resistors. On the back are header pins that plug in to the logic board. The Logic board holds the 4 register chips and the ATtiny85. On the back are headers for the Display board to plug in.

Logic and Display boards: 

Both boards together and running: 

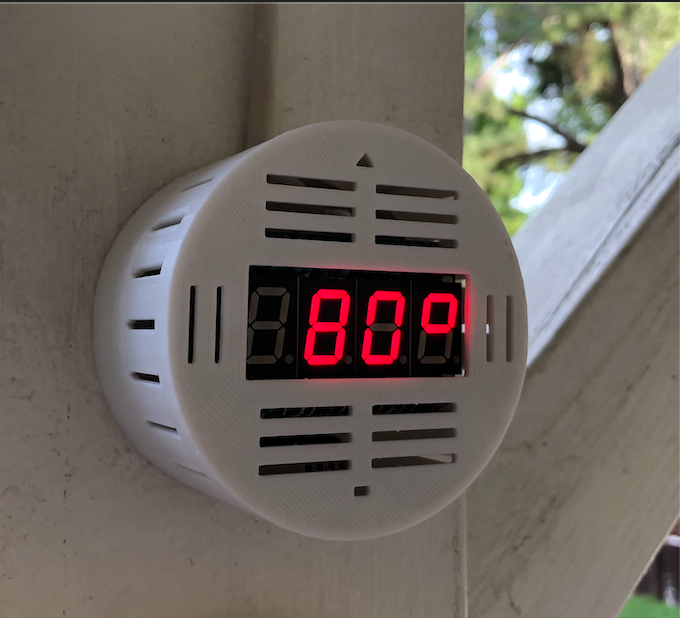
I printed a simple cylinder case (Thingiverse) to mount the weather station and have it on the back patio: 

Power Supply

The circuit will run on 5V or 3.3V. I used an existing solar panel, battery and TP4056 charger circuit to power this project with a 3.3V regulator.

Solar Power Option

  • 1 x 2.5W 5V/500mAh Solar Cell – Amazon
  • 1 x 5V Micro USB 1A TP4056 Lithium Battery Charging Board with Protection Charger Module Amazon
  • 1 x 3.7V 3000mAh 755068 Battery Rechargeable Lithium Polymer ion Battery Pack – Amazon
  • 1 x 3.3V Linear Regulator 250MA MCP1700-3302E/TO – DigiKey