 Creativity, Inc.: Overcoming the Unseen Forces That Stand in the Way of True Inspiration Hardcover
by Ed Catmull and Amy Wallace
A Non-canonical Journal of the Learnings and Whimsy of Jason A. Cox
Creativity, Inc.: Overcoming the Unseen Forces That Stand in the Way of True Inspiration Hardcover
by Ed Catmull and Amy Wallace
 The Phoenix Project: A Novel about IT, DevOps, and Helping Your Business Win
by Gene Kim, Kevin Behr, & George Spafford
Digital transformation has lit a fire that is burning through traditional IT shops across the world telling us to adapt or be reduced to the ash heap of obsolescence. The Phoenix Project grapples with this disruptive change by telling an engaging story about an IT manager who is thrust into this fiery turmoil. The main character is ushered unwillingly and unprepared into a new leadership role where he uncovers the complex and unrelenting problems any IT shop knows all too well. Fair warning: If you have any history working in, leading or managing IT teams, you will likely have a visceral reaction to the narrative and even suspect the authors were spying on your organization. But there is hope! The main character in the story finds enlightenment and begins to implement changes based on the “Three Ways” discussed in this book that ultimately transforms the teams, balances life for the employees and successfully propels the business forward.
IT leaders will find the narrative and advice relevant, potent and inspiring. By applying the principles learned in this novel, your technology organization, like the phoenix of old, can rise from the ashes to take on the challenges of our new Digital age.
There is hope! Technology workers and leaders will find the narrative and advice woven throughout The Phoenix Project, relevant, visceral, potent and inspiring. By applying the principles learned in this novel, business and technology leaders will see how they can transform their own organizations, identify and break down unnecessary silos, improve life for technology workers, and successfully propel their businesses forward in this new Digital age.
A friend of mine at work has crafted a tiny HTTP web server in C to run on the Arduino Uno to provide an interface to manipulate external devices (imagine turning on lights, adjusting the thermostat or even opening the garage door).

References
Arduino: http://arduino.cc
Wouldn’t it be cool if you could control your MIDI equipped digital piano from your iPhone? Imagine a player piano capable of jukebox queuing up MIDI or Audio files and playing them in order. That was my goal! RPI to the rescue.
Required Ingredients:
Instructions:
My original thought was to turn the Yamaha speakers into a AirPlay device for our many iOS devices. It’s nice to pipe in background tunes without having to hook up a device. AirPlay is great way to do that but I didn’t want to spend $100+ to be able to do that. The Raspberry Pi is more than capable of doing this. I found an extremely helpful blog post here: http://www.raywenderlich.com/44918/raspberry-pi-airplay-tutorial
NOTE: Power is a big issue for the Raspberry Pi. If you are using a WiFi dongle or any other USB device, I recommend making sure your power supply has enough kick to keep the RPI going. I started out with a microUSB adapter that advertised 700mA but performance became very unstable, especially under load. I switched to a 12W Apple adapter that I had handy and the problems disappeared. The RPI FAQ recommends 1.2A (1200mA).
The Project Code: https://github.com/jasonacox/raspberrypi
bash -x cron.sh 0<&- 1>/dev/null 2>/dev/null &
Adam Burkepile has the best tutorial I’ve found on how to set up a RPI for AirPlay:
http://www.raywenderlich.com/44918/raspberry-pi-airplay-tutorial
The RPI is great for a tiny file server! At the least, having it run an AFP server will allow quick drag and drop transfer from your Macs. A Samba service for Windows shares is easy to set up as well.
sudo apt-get install netatalk
Yes, it is that easy. Finder will now show your Raspberry Pi under “shared” along with any other local network shares:


HTTP Server Response Diagnostic Tool
I love cURL. Systems engineers, developers, administrators, QA engineers and web operations specialist everywhere have used the curl tool to help troubleshoot web server responses. It gives a quick view into exactly what is being sent from a web server to a browser.
On a commute home from work I started to think how handy it would be if the small computer I was holding, my iPhone, had a simple to use app like curl to do the same troubleshooting. I always wanted to write my own iPhone app so I started researching how I could do that.
My Xcode Adventure
I fired up Xcode on my Snow Leopard equipped MacBook Pro for the first time. I found a few great iOS development books on SafariOnline and started learning Objective-C. After a few chapters I started going off the page and adding views and controllers. I wanted to deploy my test apps to my iPhone so that required that I sign up as an Apple Developer (and $100!). I soon discovered that my Xcode version was too out of date to work with my iOS 6.1 devices so I attempted to upgrade, only to discover that I needed to upgrade my OS. Now on to Xcode 4.6 and suddenly my projects were running on my iPhone and iPad.
My libcurl Adventure
I discovered the NSURL class and started trying to get raw responses from web servers to display to the textview. It was too digested and would require a lot of effort to simulate a raw curl session. I started looking at the NSStream class when a friend suggested that I investigate a precompiled version of libcurl (the cURL library from Daniel Stenberg) for the ARM processor. Instead, I found a great post by Nick Zitzmann where he shows how he compiled libcurl and even provides a binary: http://seiryu.home.comcast.net/~seiryu/libcurl-ios.html
I managed to get the latest version of libcurl to compile and also included the Apple SecureTransport library (–with-darwinsll in libcurl config):
#!/bin/bash

cd curl-7.29.0

export IPHONEOS_DEPLOYMENT_TARGET="4.3"

export CC="/Applications/Xcode.app/Contents/Developer/Platforms/iPhoneOS.platform/Developer/usr/bin/llvm-gcc-4.2"

export CFLAGS="-arch armv7 -arch armv7s -pipe -Os -gdwarf-2 -isysroot /Applications/Xcode.app/Contents/Developer/Platforms/iPhoneOS.platform/Developer/SDKs/iPhoneOS6.1.sdk"

export LDFLAGS="-arch armv7 -arch armv7s -isysroot /Applications/Xcode.app/Contents/Developer/Platforms/iPhoneOS.platform/Developer/SDKs/iPhoneOS6.1.sdk"

./configure --disable-shared --enable-static --with-darwinssl --disable-dependency-tracking --host="armv7-apple-darwin" --prefix=~/Code/curl/device

make -j `sysctl -n hw.logicalcpu_max`

make install
I added the libcurl.a library to my Xcode project and started using the easy interface API via CURLcode curl_easy_perform(CURL * handle ). The realtime feel of iCurlHTTP comes from the use of the CURLOPT_WRITEFUNCTION option to push realtime code into a view controller method that renders to the textview object. It required periodically having the thread give up time to the mainRunLoop (via message to NSRunLoop) in order to allow the display to render and respond to user events.
iCurlHTTP v1.0 Born
iCurlHTTP was born. It was a simple, easy to use iOS app that allowed you to run simple cURL like tests, simulating different web browsers to retrive the raw HTTP headers and HTML response from the web servers.

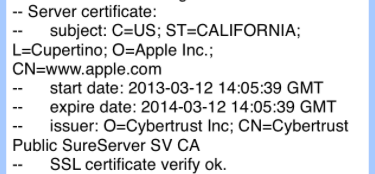
OpenSSL Anyone? iCurlHTTP v1.1
The SecureTransport library works great but provided less details on SSL connections than what I was accustomed to seeing with curl. I wanted more x509 decoded information, specifcially SSL certificate details about expiration date. The OpenSSL library would allow for this so I began another search to get OpenSSL library for ARM7. To get what I wanted, I cross-compiled both OpenSSL and libcurl together. With that I was able to get the great openssl detail in the output, including cert info:
I managed to cross compile libcurl and openssl separately for armv7, armv7s and i386 architectures but later found a great GitHub project script created by Miyabi Kazamatsuri that does both. I forked his code and updated it to work with Xcode 5 (clang for iPhoneOS and iPhoneSimulator) and added the 64-bit arm64 and x86_64 architectures. The script is available on my GitHub: https://github.com/jasonacox/cURL-SSL-for-iOS
UPDATE: I later put together a much better build script for openssl+libcurl that creates libraries for Mac, iOS and tvOS (Apple TV) targets: https://github.com/jasonacox/Build-OpenSSL-cURL
HTTP Timing and iOS 7 support added to iCurlHTTP v1.2
Curl has the ability to provide timing data for DNS lookup, TCP Connect, SSL Handshake, First Byte and Total time. For example…
curl -k -s -o /dev/null -w '%{time_namelookup} %{time_connect} %{time_appconnect} %{time_pretransfer} %{time_redirect} %{time_starttransfer} %{time_total}n' https://jasonacox.com
I wanted to add this to iCurlHTTP to give a mobile perspective on these numbers. In v1.2, I added this in the detail response view and as timing data points listed along the bottom of the UI.
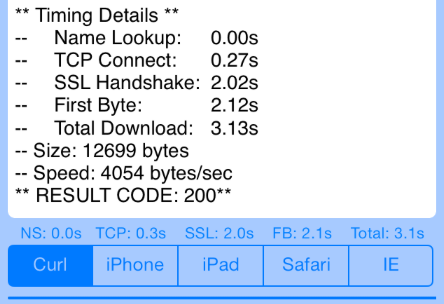
The v1.2 version also includes the iOS 7 SDK updates and the new minimalist UI look and feel.
iCurlHTTP 1.3 Wish List
Thanks to great feedback, I captured several feature requests from the iCurlHTTP user base that became the goal for version 1.3:
This meant I needed to be able to have a User Settings pop-up screen to allow users to enter custom fields for headers and posts. I also wanted to allow the ability to have a custom user-agent, http authentication (user/password), SSL options and possibly others in the future.
I knew I wanted a table based form to allow for formatting, scrolling and auto-positioning. I considered using the Settings bundle but I needed multi-line UITextView input (especially for custom headers). There are several great open source solutions but my favorite version was FXForms, written by Nick Lockwood (https://github.com/jasonacox/FXForms). I used a simple plist for settings persistence.
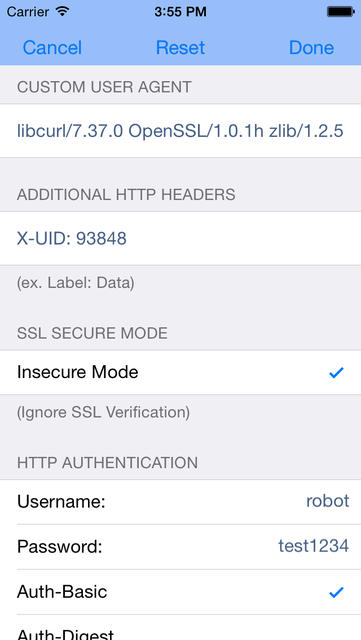
The following features are added in version 1.3:
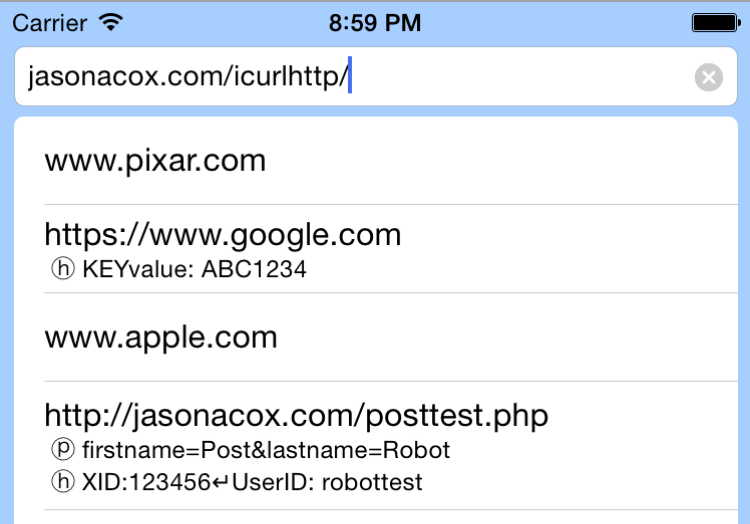
iCurlHTTP 1.4 Enhanced History
The goal of the 1.4 update was to enhance the URL dropdown history by adding HEADER and POST data for easy repeated testing. I used simple (h) and (p) symbols to denote header and post respectively:
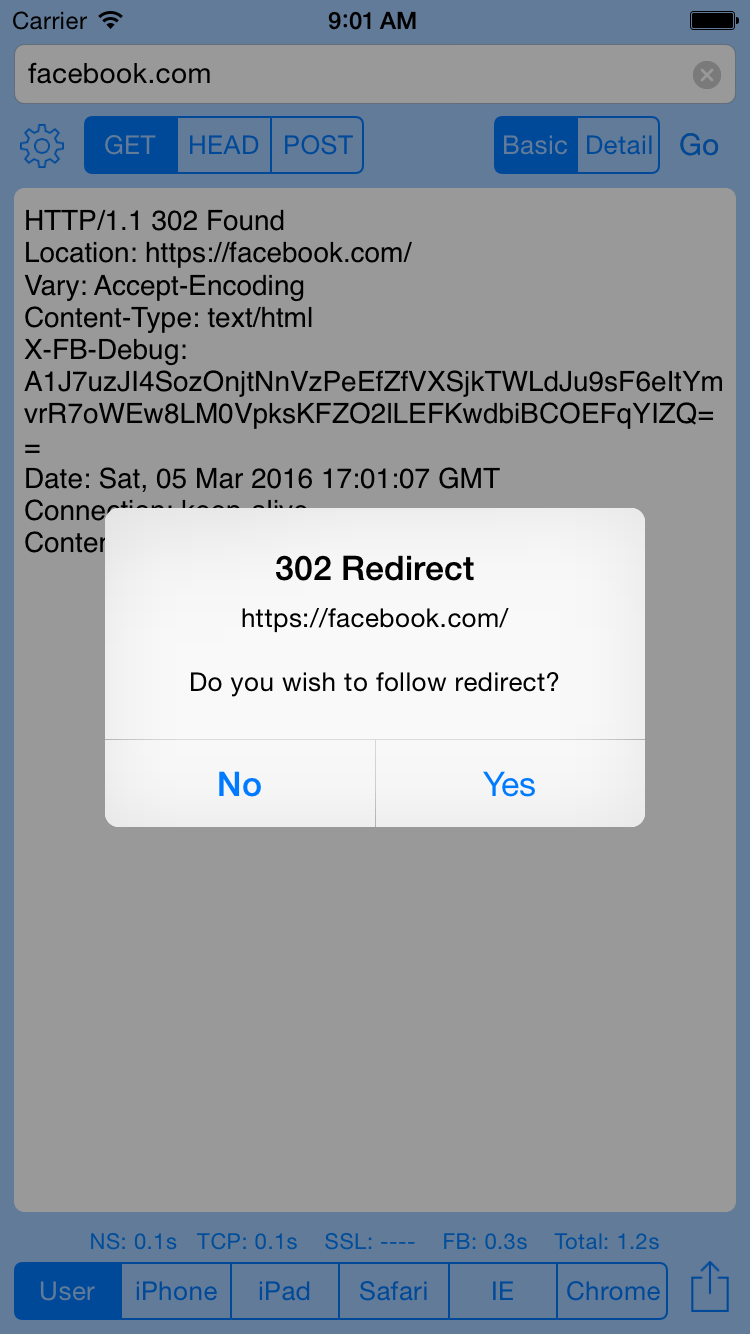
iCurlHTTP 1.5 Redirect
I had several requests to add a “follow redirect” features (similar to curl -L command) to make it easier for users to test. I didn’t want this to be purely automatic because it would defeat the purpose of the granular detail that cURL provides so I present the user with a popup dialog when a 301 or 302 redirect response is received and list the redirection URL they can follow. In this version, I also replace the ugly text “User” (settings) and “Share” buttons with the well known icons to help make it more intuitive.
I’m amazed at how this small and simple project continues to grow (both in users as well as feature requests). It has been a fun adventure! I frequently recommend other try building their own apps. iCurlHTTP is written in Objective-C but I would definitely recommend trying out Swift. I’m in the process of porting iCurlHTTP to the Apple TV (seems ridiculous, I know but I have to do it just for fun) and hope to try my hand at Swift.
iCurlHTTP 1.6 & 1.7 – HTTP/2.0 and IPv6 Update
For those wanting the libcurl, openssl and nghttp2 (HTTP2) libraries for iOS or tvOS (AppleTV), I have posted a build script on github: https://github.com/jasonacox/Build-OpenSSL-cURL
Thanks to request from users, I added the following features:
iCurlHTTP 1.8 & 1.9 – Performance Improvements
THANK YOU!
Thanks for your great feedback and support! I really appreciate the kind words and critical advice. Please send more!
iCurlHTTP Website: www.jasonacox.com/icurlhttp
![]()
Reference and Thanks!
I wanted a music workstation synthesizer and my wife wanted a real acoustic piano that looks like beautiful furniture. We compromised by getting the Yamaha Clavinova CLP-440. It looks, sounds and feels like a real piano with enough tech (MIDI, USB, voices) to make a armchair techy musician like me happy. The PDF documentation covers most of the details you will need to start using the nice features, but there are a few things lacking so I’ll record some of my discoveries in this post.
 USB Files
The piano has a USB port that will easily accommodate a thumb drive or external hard drive. It stores and reads MIDI and WAV files.
Files created by the Clavinova will be stored in the “User Files” folder with a name USERSONG??.MID for MIDI files and USERAUDIO??.WAV for Audio files saved from the Clavinova. The ?? is the number of the song selected from the Clavinova LED interface. Here is an example listing of files on the USB drive:

USB Host with iPad
I wanted to be able to use my iPad to link to the piano for added voices and sequencing. There are several MIDI options available for the iPad, but since the CLP-440 has a USB host port, I was able to use an iPad camera kit (essentially an adapter to allow the iPad to view pictures from a SD card or USB camera). The Apple version and third party version should work fine. Using that, I found that several apps could see and control the CLP-440.
iPad Apps for the CLP-440
Searching the Apple iTunes store for app to work with the Clavinova wasn’t easy. I’ll record a few good apps that I found.
GarageBand
http://itunes.apple.com/us/app/garageband/id408709785?mt=8 – This $5 app from Apple is amazing on its own but it works great with MIDI from the Clavinova.Midi Monitor
http://iosmidi.com/apps/midi-monitor/ – This app shows the iPad connecting to the Clavinova and the events coming from the keyboard (as well as driving action back to the keyboard through the iPad interface). Useful for troubleshooting.Alchemy mobile Synth App
http://www.camelaudio.com/AlchemyMobile.php – This great app from CamelAudio adds a great selection of synth voices to be controlled by the Clavinova. As their site says, “Turn your iPhone/iPad into a powerful synthesizer! Alchemy Mobile includes everything from evolving soundscapes and fat basses to lush pads and pulsing arpeggios, and is available for free from the iTunes App store.”
Simple LED Flasher Project
I wanted to put together a simple two LED flasher circuit that would use the fewest parts and low power. My first project of this type used the NE555 timer IC but besides the chip, it requires more power than what I would like to use. Using a couple low-power NPN transistors, the circuit should be able to run for hours on a 9v battery.
The Circuit
I decided to use two 2N3904 transistors (a low power NPN transistor). This design uses only 10 components but I added additional resistor to inline with the power source. It could be removed and the other resistors adjusted to lower the power.

I used a free copy of LTSpice from Linear Technology to create the circuit (most SPICE packages do not have LED components for some reason) – you can download it here: http://www.linear.com/designtools/software/ltspice.jsp
Which LED will light first?
The Breadboard
I assembled the circuit using a low cost breadboard I picked up at Fry’s Electronics. Using a breadboard allowed me to play around with different components, especially the capacitors and resistors to tweak the flash rate and brightness.

Single LED Flasher
The simplest single LED Flasher circuit I have found uses a single transistor (NPN), 2 resistors and 1 capacitor. This circuit uses the transistor as a Negistor using the NDR (negative differential resistance) effect. The transitor will block current until the voltage threshold charging on C1 reach something close to 9v, at which point the voltage will become large enough to get the emitter-base junction to avelanche and drain the current through the LED.

Click here for the video:
http://jasonacox.com/images/IMG_2022.MOV
Reference
http://wild-bohemian.com/electronics/flasher.html
http://en.wikipedia.org/wiki/2N3904
http://www.linear.com/designtools/software/ (LTspice – Nice circuit design tool based on Spice)
http://jlnlabs.online.fr/cnr/negosc.htm
http://www.cappels.org/dproj/simplest_LED_flasher/Simplest_LED_Flasher_Circuit.html
The Amazing Samsung B630 LCD TV
On 6/20/09, we purchased a Samsung B630 40″ LCD TV. The B630 has an amazing picture. The 120Hz and high contrast features make this 1080p LCD monitor simply a delight. The unit comes with 4 HDMI inputs as well as two standard A/V inputs for game consoles (great for the kid’s Wii and Playstatation2). It also has a network port that pulls in news and weather feeds so you can hit an “info” button the remote and get semi-transparent overlay info boxes while watching your favorite show or movie.  Yes, this is more of a gee-whiz feature than actually useful though we have used it to check the local weather–its accuracy hasn’t been very impressive.
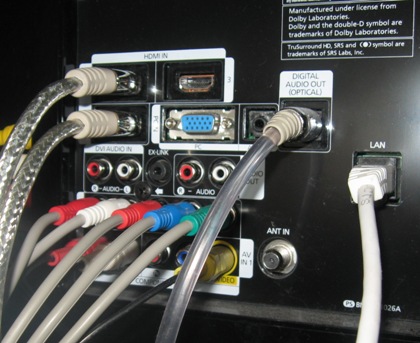
The set has an audio optical out. I have this fed in to the Samsung DVD home theater system we purchased with the TV. As expected, the sound is great but activating it always generates a pause while the TV and receiver sync up. The set also has a USB port on the side that allows you to play media files (pictures, music and movies) from thumb drives and external hard drives. It is a fantastic feature and providing you have a good quality USB drive, it will stream beautiful full 1080p video.
HDMI Problems
Just over 2 months after buying the unit, our cable suddenly stopped working on our new Samsung B630 LCD TV. After some quick troubleshooting I discovered that it was only the HDMI-1 input that the cable box was using. The Samsung DVD Player on the 2nd HDMI port worked fine and the Cable would work when plugged in to any of the other inputs.
I notice another strange behavior. When the Cable and DVD cables were plugged in to HDMI-2 and HDMI-3, only one of the source inputs would work. If you select 2 or 3, you would still see the same thing (the Cable which was plugged in to HDMI-3). Moving things around to the other ports, I was able to do the same thing with the DVD. This mean that we were not able to use the 2nd or 3rd ports to have HD signal from both the Cable and DVD player. I eventually hooked up the component cables for the Cable box to the TV so that we could continue to view the up-conversion HD quality of our DVDs.
Samsung Support
The Sumsung website let’s you register and request repair for your Samsung products. Besides the Samsung LCD TV and Home Theater System, we purchased and registered our Samsung washer and dryer. The website can be very frustrating at times. It is slow and will frequently glitch. At one point, I encountered a page that had a huge listing of products, complete with their serial numbers and details from other customers. I didn’t drill in to see if it would present me with customer PII data, but clearly it shows that their web development team has work to do.
I did manage to report the HDMI problem via the website. It does require that you upload the original receipt. Unfortunately we had lost this (yes, not a good thing) but we had purchased this at Sears and the sears.com site will allow customers who used their Sears credit to view transaction receipts online. This allowed me to copy/paste into a Word document and upload that to the Samsung site. The site let us pick a date for the in-home repair and selected Monday. We received a call the next morning from the repair team. After getting the details of the problem, they moved the schedule to Tuesday and said they would bring the components that they felt would fix the HDMI problem.
Repair Visit #1
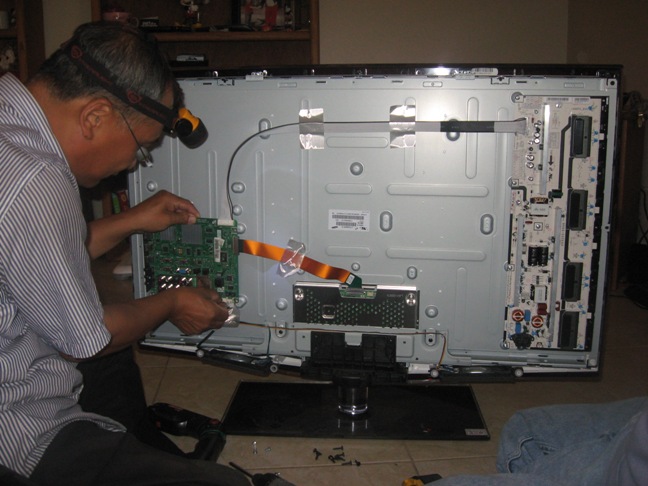
The in-home repair technicians arrived and brought the mainboard replacement. It looks like a small PC motherboard and is located in the lower left hand corner of the back of the TV, behind the connectors. I took a picture as the techs were installing the new motherboard.
After installing the new motherboard, the TV flashed a red error message at the top of the set. The tech attempted to reset the unit using various menu options (picture, firmware, etc.) but it would not clear. He said that the new mainboard was defective and he would need to order a new one. He re-installed the old mainboard.

After installing the old mainboard, the HMDI ports started working again! I asked what they did and he said that it looks like the mainboard has a faulty connector that caused the outage. He said that it does need to be replaced and they would order a new mainboard. Until then, the HDMI may or may not stay working. Hopefully it will keep working until they return for their second visit.
It is interesting that Samsung would not quality check their mainboards before sending them out in to the field. It seems to be a bit inefficient and if our old main-board had not mysteriously started working, it would be very frustrating for the customer. But I will say that the repair technicians were very good. They were friendly and quick.
Repair Visit #2
The technicians returned in two weeks to install the new mainboard. Thankfully the HDMI port did not go out again before the second visit.
References
Samsung Website for B630 (firmware updates, FAQs, manuals, etc.)
I have a e-Geforce FX 5200, 128MB, DDR, AGP Video Controller (p/n 128-A8-N303-L2). We started having video glitches (blue screens, static and bad lagency on video games). I took out the controller and noticed that 3 of the capactiors had popped. Two are FZ72 1000 16V caps and one is a FZ75 1000 6.3V.

This autobiography of Steve Wozniak is a delightful recount of the birth of the personal computer.
 Before cell phones that fit in the palm of your hand and slim laptops that fit snugly into briefcases, computers were like strange, alien vending machines. They had cryptic switches, punch cards and pages of encoded output. But in 1975, a young engineering wizard named Steve Wozniak had an idea: What if you combined computer circuitry with a regular typewriter keyboard and a video screen? The result was the first true personal computer, the Apple I, a widely affordable machine that anyone could understand and figure out how to use.
Wozniak’s life—before and after Apple—is a “home-brew” mix of brilliant discovery and adventure, as an engineer, a concert promoter, a fifth-grade teacher, a philanthropist, and an irrepressible prankster. From the invention of the first personal computer to the rise of Apple as an industry giant, iWoz presents a no-holds-barred, rollicking, firsthand account of the humanist inventor who ignited the computer revolution. 16 pages of illustrations.